Zoho CRM is sales force automation software for enhanced productivity that lets you generate and manage leads, see your pipeline, manage account details, engage with contacts, automate routine tasks, and route leads automatically, all from a single location. Powerful forecasting and analytics tools let you spend your time negotiating opportunities rather than trying to calculate where they may lie.
Imagine getting immediate alerts when customers and prospects respond to emails, enabling your sales team to reply instantly, add follow-ups, and take notes, all from one integrated location.
By integrating your email with Zoho CRM, incoming and outgoing emails are automatically associated with customer records, saving time and ensuring important details aren’t missed.
What Are the Benefits of Integrating Email With Zoho CRM?
1. Streamlined communication
Even though the CRM is a salesperson’s primary tool, most communication with customers and prospects happens through email. Without email integration, a lot of time is wasted switching between CRM and email to read incoming, send follow-ups, and update details.
2. Improved tracking/management of emails
Zoho CRM confirms when your email was delivered, if it has been opened, and when it was read. Advanced filters identify leads who don’t respond within a certain period – and, conversely, those who are responsive and ready to close – so you can plan follow-ups strategically. Through individual scheduling or a one-time automated workflow setup, personalized follow-up emails can be scheduled to send at the most beneficial time.
3. Higher productivity
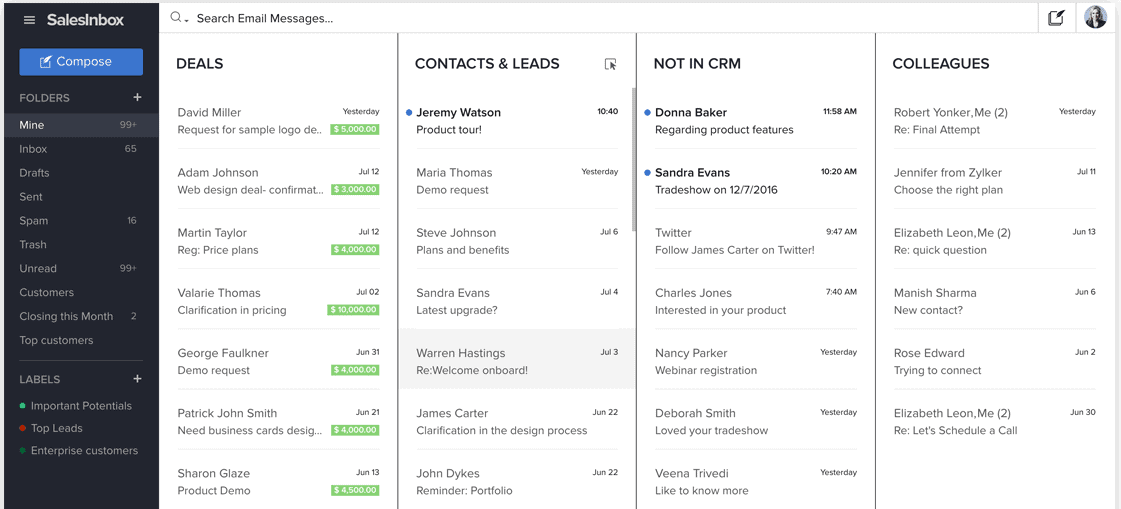
Regardless of which email client you integrate with Zoho CRM, incoming messages will be organized according to the CRM pipeline, helping you stay on top of high-value deals. Through individual scheduling or a one-time automated workflow setup, personalized follow-up emails can be scheduled to send at the most beneficial time.
4. Better management of customer relationships
Built-in analytics provide deeper insights into customer accounts. View customer activity, associated contacts, pending deals, ongoing projects, and more from a single location. Communicating with multiple decision-makers is much easier when you take advantage of Zoho CRM’s parent-child feature to set them up as separate accounts under the same parent.
Steps to Integrating Your Email With Zoho CRM
-
Define business email requirements
Zoho CRM can integrate email through API (Gmail), exchange (Outlook), or other service providers through IMAP and POP protocols. In this article, we will outline the process for IMAP and POP protocols.
The IMAP email protocol allows email activity to remain in sync across multiple devices (computers, laptops, mobile phones, and tablets). Emails stay on the email server rather than downloading onto a device.
The POP3 email protocol downloads emails from the server to a specific device. Unless configured to “keep messages in the server,” downloaded emails are automatically deleted after downloading. If your business email requires POP#, Zoho CRM will sync and display the emails in the Zoho SalesInBox.
2. Check compatibility with your business email provider
Zoho CRM is compatible with popular business email clients – including Outlook, Gmail, and Yahoo – in addition to Zoho Mail. If you use a different email client, check with your provider regarding its compatibility with Zoho CRM. As noted above, Zoho CRM can accommodate any email client that uses the IMAP or POP3 protocol.
3. Access email settings in Zoho CRM
- In Zoho CRM, navigate to Setup > Channels > Email > Email Configuration. Then, under the Email tab, click “Get Started” and select Popular Email Service.
- Under Choose the Protocol to Configure, select either IMAP Integration or POP Integration. Click Configure.
- Enter the email account’s Display Name, Email Address, and Password. Click Configure.
- In the Import Filter popup, click Import. (This can be skipped and done later.)
- Under Email Sharing Settings, choose the desired sharing permission level from the drop-down list.
- In the More From Address, the Default Address field should display the email account’s display name that you entered above.
- Click Add Email Address to enter more “From” email addresses, if needed.
- IMAP users only – Under Folder Mapping, select the folders from your custom mailbox to map with the appropriate folder in the Zoho SalesInbox.
- Click Server Details to view the incoming and outgoing server settings. These are automatically populated by selecting one of the popular IMAP integrations.
- Under Email Sharing, select Private, Public, or Custom record sharing as required.
- Click Update
4. Validate the email account
Adding A Signature In Zoho CRM (and Other Customizations)
How to add a signature
- In Zoho CRM, navigate to Setup > Channels > Email > Email Configuration. Then, under the Compose tab, you’ll find the Email Signature section.
- Name your signature and assign the email address associated with your signature. If you’ve set up other organization emails or from addresses you can associate signatures with these addresses in this section as well.
- Click Save. Now that you have configured an email signature, it will automatically insert into the body of any email sent from Zoho CRM.
How to create an email template
- Navigate to Setup > Customization > Templates > Email.
- Click + New Template.
- Select the module for which the email template is being created (Zoho CRM) from the drop-down list and click Next to be taken to the Template Gallery page.
- You then have the option to create an email template from scratch, choose a predesigned template, or insert HTML code.
- To create an email template from scratch, choose the Blank template from the Template Gallery. Drag and drop required components from the All Components section onto the template and customize as needed. Set the Name and Subject of the template and Save the template to the appropriate folder. Thereafter you can customize the template using the template builder.
- To choose a predesigned template, view those included in the Template Gallery. Select any available template and customize using the drag-and-drop template editor.
- To insert HTML code, navigate to Setup > Customization > Template. In the Template Gallery, select the link titled Insert HTML code/Plain text. Click on the HTML icon, paste your HTML code, and click Insert. Then click Save.
How to create autoresponders
You can set a maximum of 3 autoresponders and a maximum of 5 follow-ups per autoresponder.
- Click the Leads/Contacts tab. On the Leads/Contacts Home page, select Actions > Autoresponders. On the Autoresponders page, select Create Autoresponder.
- On the New Autoresponder page, enter the autoresponder’s Name. Select the owner of the record from the Assigned To list. (By default, this field will display the name of the user creating the autoresponder unless you change it.) Select Custom View to choose the autoresponder recipient list.
- Select a Folder for the autoresponder, then select whether the folder is Static or Dynamic. (Static folders are for autoresponders where the follow-up happens on a fixed date; for Dynamic folders, the follow-up happens on predefined intervals you set.)
- You can add follow-ups at this time if needed. After selecting the email template for the follow-up, you will be prompted to enter the From and Reply-To email addresses from the drop-down list.
- Click Save.
How to create email workflows
If you have IMAP configuration enabled in your account, you can set up workflow rules for incoming emails. There are three parts to the process:
- Rule execution – When the rules should be executed for incoming and outgoing emails, such as Received, Unreplied, and Opened and Unreplied for incoming emails and Sent, Bounced, Opened, Clicked, Opened and Unreplied, and Unreplied for outgoing emails.
- Specify condition – Once you’ve defined when to execute, you need to specify the condition(s) that should be met for the rule to execute. Conditions can be set for a specific email field (attachment name, CC, sender, sent to, has attachment, and subject) or a module (leads, contacts, unknown, or custom). For example, you could set a condition that if the email has an attachment that contains the word “Proposal” in its file name, then execute the rule.
- Specify the immediate action – Once conditions are met, you must specify the action. These can include task, create record, webhook, function, or notify.
The step-by-step process is as follows:
- Go to Setup > Automation > Workflow Rules. Click Create Rule.
- On the Create New Rule page, select the Email module from the drop-down list, enter the rule name and description, and click Next.
- Under When do you want to execute the rule?, select Incoming email or Outgoing email from the drop-down list. Click Next.
- Under Would you like to set conditions for email fields?, select Yes or No. (If you choose Yes, specify the field names you want to set conditions for.)
- Under Apply this rule to, choose a module.
- Under Which do you want to apply this rule to?, select All or Specify the conditions. Click Next.
- Under Instant actions, select an action. Click Save.
How ZBrains Can Help with Zoho CRM Email Setup
Zoho software can do almost anything. But to do that, it has to be configured for your needs. As outlined above, it’s possible to configure your Zoho CRM email integration independently. But if you’d rather not take that on, or you need troubleshooting help while doing it yourself, call Zbrains.
Zbrains is a full-service Certified Zoho Consultant and offers numerous integrations. We can plan and manage the entire process for you, including field and screen customization, permission settings, workflow automation setup, converting data from your former email system, training your team, providing support, and more.
Conclusion
With most customer and prospect communication coming through email, you don’t want to miss the many advantages of integrating your email with Zoho CRM.
Regardless of which email client you integrate, Zoho CRM organizes incoming messages according to the CRM pipeline, helping you stay on top of high-value deals, and provides you with analytics that can help build more effective and profitable relationships with customers and prospects.
When you’re ready to begin integrating your email with Zoho CRM, consider whether you want to do it yourself or have Zbrains complete the process. Either way, we invite you to contact our team for guidance and support.


 You don’t want this.[/caption]


 Okay, maybe overselling it, but I’ll bet this comes in the next build.[/caption]