Need Zoho information or help due to COVID-19? Let us know.

Author : Darcie

A woman using Zoho Expense to manage her business

How to Use Zoho Expense to Manage Your Business Expenses

Zoho Expense is an expense reporting software from Zoho’s suite of powerful cloud-based business apps. It enables businesses to quickly capture, track, and report on the expenses of their employees for tax, accounting, and budgeting purposes.

It integrates with Zoho Books, allowing businesses to manage their travel and business expenses more efficiently. When used in conjunction with Zoho Books, business owners can set up their account and start using Zoho Expense right away.

Zoho Expense also offers a streamlined experience that saves time and effort. One noteworthy feature is its OCR (Optical Character Recognition) technology, which scans receipts and automatically creates expenses. While the accuracy of OCR-generated data may vary (and requires human review), it significantly reduces the time spent on manual data entry and speeds up the expense reporting process.

How to Get Started with Zoho Expense

It’s easy to get started with Zoho Expense—all you need to do is sign up. Once you’ve done that, your 14-day free trial will begin automatically.

Like most expense management software, Zoho Expense can integrate directly with your bank and identify expenses. Setting up custom criteria for automated expense classifications and categorizations saves you from having to enter each expense manually.

Here’s a brief overview of Zoho Expense’s main interface:

  1. A left-hand side Navigation panel provides an organized overview of all Zoho Expense modules.
  2. To easily create new transactions, use the Quick Create button near each respective module.
  3. Use the Search bar feature to locate a particular expense, report, or additional information.
  4. Manage your Organization Profile, subscriptions, and more by clicking the Settings icon.
  5. Contact Zoho Expense regarding any issues via the Support option.

Once you familiarize yourself with its main interface, you can begin creating expense reports and managing your company spending.

Step 1: Creating Expense Reports

Create and Manage Expense Reports

Follow these steps to create and manage your expense reports:

  1. Create a new expense report by clicking the “+” icon next to “Reports.” Fill in the required information on the New Report screen, such as:
    1. Report title
    2. Length of time
    3. Business purpose (optional)
    4. Submit to (select an approver, if applicable)
  1. Incorporate previously created expenses into the report, as needed.
  2. To add a new expense directly to the report, simply create it on the same page.
  3. Click “Save and Submit” to save your progress and immediately send the report to your designated approver.

Zoho Expense also offers customers an automated expense report generator they can use for free with the software.

Approve Expense Reports

Follow these steps to approve, reject, or reimburse expense reports effectively:

  1. Click on “My Approvals” located on the left-hand side of the screen.
  2. Choose an expense report that requires approval or rejection.
  3. Decide whether to approve or reject the report based on its content and accuracy.
  4. If necessary, send the report to another stakeholder instead of approving or rejecting it yourself.
  5. Leave a comment for clarification or additional information, or send an email to the reporter.
  6. Reimburse expenses after approval from all stakeholders involved.

Configure Expense Preferences

Establish essential preferences and company policies for expenses by following these steps:

  1. Click on “Settings” located on the left-hand side (LHS) of the screen.
  2. Choose “Expenses” from the Preferences section to access expense-related settings.
  3. Define the currencies to be used for recording expenses.
  4. Add custom fields to the expense creation page, allowing for more detailed and organized records.
  5. Set up Notifications for expenses to stay informed about important updates and changes.

Step 2: Managing Business Expenses

Zoho Expense offers numerous features, such as Mileage Tracking and Expense Reporting Automation, to help you efficiently monitor your business expenses for different activities and events. Depending on your business and its expense types, you can use these features to get better insights into your spending and manage it more effectively.

To analyze expenses and gain better visibility into your spending, follow these steps:

  1. Select “Analytics” from the left-hand side of the screen to access expense analytics.
  2. Choose a specific report from the left pane that fits your needs.
  3. Customize the report according to your requirements for a more detailed analysis.
  4. Print or export the report as a PDF for easy sharing and review if needed.

Zoho Expense integrates natively with other Zoho products, including Zoho Books, Zoho CRM, and Zoho People. It also integrates with Quickbooks for a more comprehensive view of your finances.

Integrate with other systems using the Zoho Expense API or Zapier to automate and streamline expense processes.

How to Best Manage Business Expenses

Managing business expenses is straightforward, and automating the process makes it less error-prone. Still, there are a few issues you can run into if you don’t follow these best practices:

  • Ensure that all company policies and preferences are set up correctly to maintain consistency across expense reports.
  • Regularly review and update expense categories to reflect your business’s evolving needs.
  • Utilize the Analytics feature to monitor spending patterns and identify areas for cost reduction.
  • Set up expense rules to automate categorization and streamline the approval process.
  • Integrate Zoho Expense with other business applications for seamless data sharing and improved efficiency.

Tips to Improve Expense Management Efforts

Failing to establish clear expense policies can lead to compliance issues. And neglecting to consistently update and maintain expense categories results in inaccurate data and analysis.

To improve your expense tracking efforts with Zoho Expense, use the following tips:

  1. Encourage employees to submit expenses on time and attach receipts for accurate documentation.
  2. Set up automated notifications to remind employees and approvers of pending tasks and deadlines.
  3. Regularly review expense reports to identify trends, anomalies, or potential fraud.
  4. Train employees on how to use Zoho Expense effectively, and work with a reputable third-party consultant for insights and help.

Zoho Expense Mobile App

Zoho Expense is available on both Android and iOS devices, allowing users to manage expenses on the go. The mobile app enables employees to quickly capture receipts, create and submit expense reports, and even track mileage, ensuring that expense management is convenient and efficient, no matter where they are.

Conclusion

Zoho Expense is a powerful and easy-to-use expense management platform for businesses of all sizes. Automated expense tracking and robust analytics help organizations control costs and get better insights into their spending.

For more on Zoho Expense setup, API integration, and company-wide deployment, contact our team for help.

Employee using Zoho Campaigns: Autoresponders with help of ZBrains

Zoho Campaigns: Autoresponders vs. Workflows

Businesses use Zoho Campaigns to capture website leads, nurture them through the marketing funnel, and execute their email marketing strategy.

In this article, we’ll show you how to work with these Autoresponder and Workflow, Zoho Campaigns’ two tools for automated communication, and how you can leverage them in your email marketing campaigns for maximum impact.

Maximizing Engagement with Zoho Campaigns’ Autoresponders

In Zoho Campaigns, autoresponders allow you to create a series of emails that automatically send at predetermined intervals or based on certain actions your subscribers take, such as signing up for your newsletter, downloading an eBook, or making a purchase.

A few examples of when to use autoresponders include:

  • Welcome emails
  • Educational series
  • Abandoned cart reminders
  • Post-purchase follow-ups
  • Confirmation emails

These time-saving automations boost engagement while creating a more personalized experience for your customers.

What are Workflows?

Workflows are more sophisticated than autoresponders, as they enable you to create multi-step and multi-channel journeys.

You can use workflows to segment your subscribers into different groups based on their interests and preferences, then plan personalized messages designed to reach their inbox at exactly the right time, or in response to a trigger, such as sending a discount code when someone purchases a certain item.

In Zoho Campaigns, workflows are triggered by events or conditions that you specify in advance.

For example, you can set up a workflow so that when someone subscribes to your newsletter, they automatically receive a welcome email plus additional emails over the following weeks about your products and services.

You can also configure workflows to send out surveys or discounts based on certain criteria or customer segments such as their location or purchase history.

Like autoresponders, they are massive time savers and help keep your customers engaged. They make your life even easier by allowing you to create an automated sequence of emails and actions that can be monitored for conversions and adjusted as needed.

Autoresponders vs. Workflows: When To Use Each

Autoresponders are based on time intervals or specific subscriber actions, while workflows use more complex triggers, such as subscriber engagement, lead score, or changes in contact information.

They are also simpler tools—companies primarily use them for linear email sequences. Workflows allow you to build branching email campaigns based on multiple conditions.

Workflows offer greater flexibility in terms of targeting, segmentation, and tracking.

Use Autoresponders for:

  • Simple, time-based email sequences (e.g., welcome series, educational content)
  • Basic follow-up emails based on specific subscriber actions (e.g., abandoned cart reminders, post-purchase follow-ups)
  • Help desk or customer service emails that require immediate response (e.g., confirmation emails, account verification)

Use Workflows for:

  • Complex email campaigns that require branching and multiple conditions (e.g., targeted promotions based on user behavior or preferences)
  • Advanced targeting and segmentation (e.g., sending emails based on lead score, engagement, or changes in contact information)
  • Improved tracking and reporting to optimize email performance

How to Create Autoresponders and Workflows in Zoho Campaigns

Create an Autoresponder

To create an autoresponder, follow these steps:

  1. Navigate to the toolbar and select “Automation,” then choose “Autoresponders.”
  2. Click on “Create Autoresponder” and hover over the Signup autoresponder before clicking “Create.”
  3. Fill in the necessary information:
  4. a. Assign a name to the autoresponder for easy reference.
  5. b. Choose a mailing list associated with your autoresponder or create a new one if needed.
  6. c. Opt to include contacts added to your mailing list through Import and CRM Sync, if required.
  7. Click “Create.”

The Signup autoresponder offers two views: timeline and tree view. You can switch between these views using the toggle button in the top-right corner.

Create a Workflow

To create a workflow in Zoho Campaigns, follow these steps:

  1. Go to “Automation,” select “Workflows,” and click “Create Workflow” in the top-right corner.
  2. Choose a template for the desired workflow type or create a custom workflow.
  3. Select a trigger from the left panel to initiate the workflow and configure it on the canvas.
  4. Pick a flow control component or condition component from the Process section and set it up on the canvas.
  5. Add and configure actions from the Engagement, Productivity, or Zoho CRM categories.
  6. Click “Activate” in the top-right corner to enable your completed workflow.

Best Practices When Using Autoresponders and Workflows

When using Autoresponders and Workflows, remember the following best practices:

  • Be aware of your subscriber’s actions. When creating an autoresponder or workflow, consider the actions that the subscribers have already taken. For example, if someone has already made a purchase from you, don’t include them in your onboarding sequence.
  • Only send content around topics your customers have subscribed to. Make sure your content is relevant to the topics they signed up for.
  • Test and refine your emails as much as possible. Monitor email performance and adjust your campaigns accordingly. Keep track of open rates, click-through rates, unsubscribed, etc., to ensure each campaign reaches its desired goal.
  • Limit send frequency. Avoid bombarding subscribers with too many emails. Make sure you are only sending content that is engaging and valuable, as opposed to promotional or irrelevant emails.
  • Keep your messages short and sweet. Simple formatting and plain language help readers digest the information quickly, leading to higher conversion rates.

Conclusion

Zoho Campaigns is one of the most straightforward and robust email marketing platforms that you can use to create autoresponders and workflows. Autoresponders are ideal for simple, time-based email sequences while workflows are perfect for more complex campaigns with multiple conditions. 

Following the steps in this guide, you can create successful campaigns that will engage your customers and drive conversions.

If you’re still having trouble setting up and automating your campaigns, chat with us for more help.

Zoho Quickbooks Integration

Zoho CRM Integration: Benefits and Process

With more than 80 percent of the SMB market share, QuickBooks is by far the world’s most popular accounting software. Businesses use QuickBooks to track income and expenses, pay bills, send invoices, and produce files and reports for their accountants. Integrating Quickbooks with Zoho CRM takes account management capabilities even further, automating repetitive data entry processes and enabling more agile interactions with customers.

Simplify Sales and Order Process: QuickBooks Integration with Zoho CRM

Integrating QuickBooks with Zoho CRM saves businesses a lot of time by eliminating the need for duplicated, manual data entry. Integration helps to lessen errors in the sales and order process and eliminate data conflicts by synchronizing contacts, quotes, products, vendors, sales orders, invoices, and other data fields.zoho crm

Following integration, the salesperson can enter the order in CRM and the software manipulates the record type as the order is processed, filled, and invoiced. Once the order has been filled and invoiced, the software syncs the information back to the original system.

The process of integrating QuickBooks differs depending on whether you use QuickBooks Online or QuickBooks Desktop. Here’s an overview of the integration process for each.

QuickBooks Online <> Zoho CRM Integration

For QuickBooks Online, there are two integration alternatives – using Zoho’s integration platform, Zoho Flow, or using a service provider to allow custom syncs.

Zoho Flow is Zoho’s DIY tool for connecting cloud applications and automating complex business workflows without needing to write any code. The platform works with over 400 business applications (including QuickBooks Online) and offers over 500 ready-to-use integrations. Its drag-and-drop integration builder can also accommodate a degree of custom integration. If you need deeper integration or run into problems using Zoho Flow, reach out to us at ZBrains.

Companies that need custom synchronizations or don’t feel comfortable undertaking such an important task on their own should work with an experienced service provider like ZBrains. We’ve done hundreds of QuickBooks Online <> Zoho CRM integrations.

Modules That Can Be Synced

Essential modules that can be synced in a QuickBooks <> Zoho CRM integration include:

  • QuickBooks Customers with Zoho CRM Accounts
  • QuickBooks Customers with Zoho CRM Contacts
  • QuickBooks Items with Zoho CRM Products
  • QuickBooks Vendors with Zoho CRM Vendors

Transactional modules that can be synced include:

  • QuickBooks Invoices with Zoho CRM Invoices
  • QuickBooks Sales Orders with Zoho CRM Sales Orders
  • QuickBooks Estimates with Zoho CRM Quotes
  • QuickBooks Purchase Orders with Zoho CRM Purchase Orders

Other modules that can be synced include but are not limited to:

  • QuickBooks Jobs <> Zoho Deals
  • QuickBooks Payments <> Zoho Payments

Major Steps in the Integration Process

All integrations include at least seven major steps, starting with the discovery phase and continuing through ongoing support post-integration.

Discovery

Before any work begins, there should be one or more planning sessions to develop the information needed to create integration specifications. These specifications will be followed in field mapping, deploying the integration, and establishing the appropriate settings.

Systems backup

Next, test environments and data backups of both QuickBooks and Zoho CRM should be created before the integration deploys.

Deployment and Testing

The deployment process, which includes integration planning, data cleanup, and field mapping, is typically completed in less than one day. That includes time spent meeting with the deployment engineers, creating test records, and verifying data.

This process typically incorporates screen-sharing sessions and involves the use of a tool such as ZBrains AgilitySync.

Sync and migrate data between systems

Data from Zoho CRM to QuickBooks or QuickBooks to Zoho CRM can be migrated from as far back as 2012. This is a labor-intensive process that normally adds 2-4 weeks to the integration timeline.

Ongoing support

However your integration is undertaken, you will need ongoing support for tasks such as mapping and settings changes, bug fixes, and answers to any questions you may have along the way.

Efficient QuickBooks Desktop Integration: Expert Guidance

Since QuickBooks Desktop is locally hosted, integrations are more complicated and there is no ready-made integration option.

You will need to use a service provider who can help you decide whether integrating directly to Zoho CRM or migrating first to Zoho Books is the best option for you. ZBrains has extensive experience working with companies on their QuickBooks Desktop integrations, with or without a Zoho Books migration.

Conclusion

Any business can reap the benefits of a QuickBooks <> Zoho CRM integration, from saving time and eliminating data conflicts, to strengthening the sales cycle and enhancing the overall customer experience. ZBrains provides total deployment assistance for QuickBooks <> Zoho CRM integrations, including standard and custom field mappings, data migration, conditional syncing, and more.

Reach out today for more information.

ZBrains Zoho Inventory Pricing

Zoho Inventory Pricing: Create Bundles for Maximum Sales

Grouping products together creates a number of benefits, such as making it easier to organize your items and increasing your selling power by enabling you to create retail product bundles with attractive pricing. 

If you’re new to Zoho Inventory, let’s take a closer look at some of the sales and marketing advantages of bundling products, as well as how to do so in Zoho

The Advantages of Zoho Inventory Pricing Bundling for Sales

When you bundle products, you can increase your revenue and stay ahead of your competitors by packaging two or more products together at an attractive price. Further, inventory bundling makes it possible to:

  • Increase your sales margin by cross-selling products. Bundling helps introduce customers to products that are compatible with each other, potentially increasing your customers’ spend at checkout. 
  • Keep your dead stock moving. Stock that’s not selling can weigh heavily on your business. With bundling, you can move slow-selling products more quickly by grouping them with other, more desirable items. 
  • Encourage your customer to buy more. If you incentivize higher spending with free shipping, for example, inventory bundling can help your customers reach your minimum order threshold. 
  • Promote new products effortlessly. When you bundle a new or obscure product with an already popular item, it’s more likely to gain a presence in your shop. 
  • Accelerate the fulfillment process. The bigger the customer’s shopping cart, the easier it is to fulfill and ship the order than if they ordered the same items across several individual purchases. With Inventory Bundles, you can package, ship, and track one single commodity, speeding up the order fulfillment process. 

How to Create Zoho Inventory Bundles

Within Zoho Inventory Pricing, Inventory Bundles are created within Composite Items or Sales Transactions. To take advantage of Bundles, you’ll need to have the Composite Items feature enabled within Zoho. Do this by navigating to Settings > Preferences > Items, and then click the ‘Enable Composite Items’ checkbox. Now, Composite Items will be accessible within the Items module.

Now, you’ll have two options for bundling in Zoho:

Bundling Items from Composite Items

  1. Open Zoho CRM
  2. Go to the Composite Items module under Items from the left sidebar
  3. Open the Composite Item for which you want to create a unique bundle
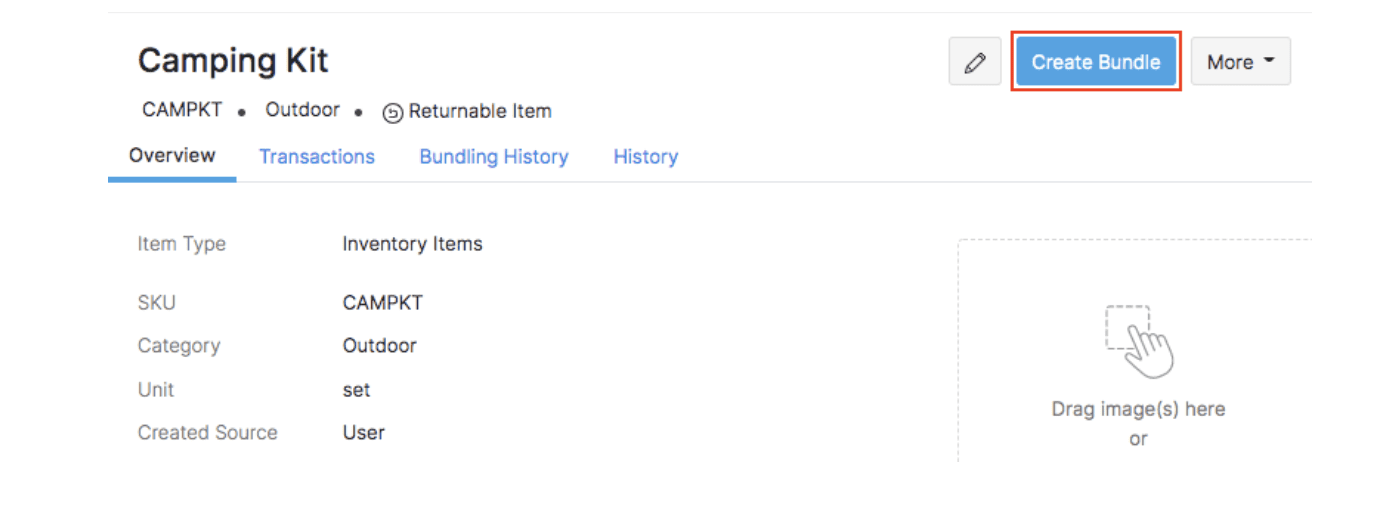
  4. Click the Create Bundle button

ZBrains Zoho Inventory Bundles Screenshot 6

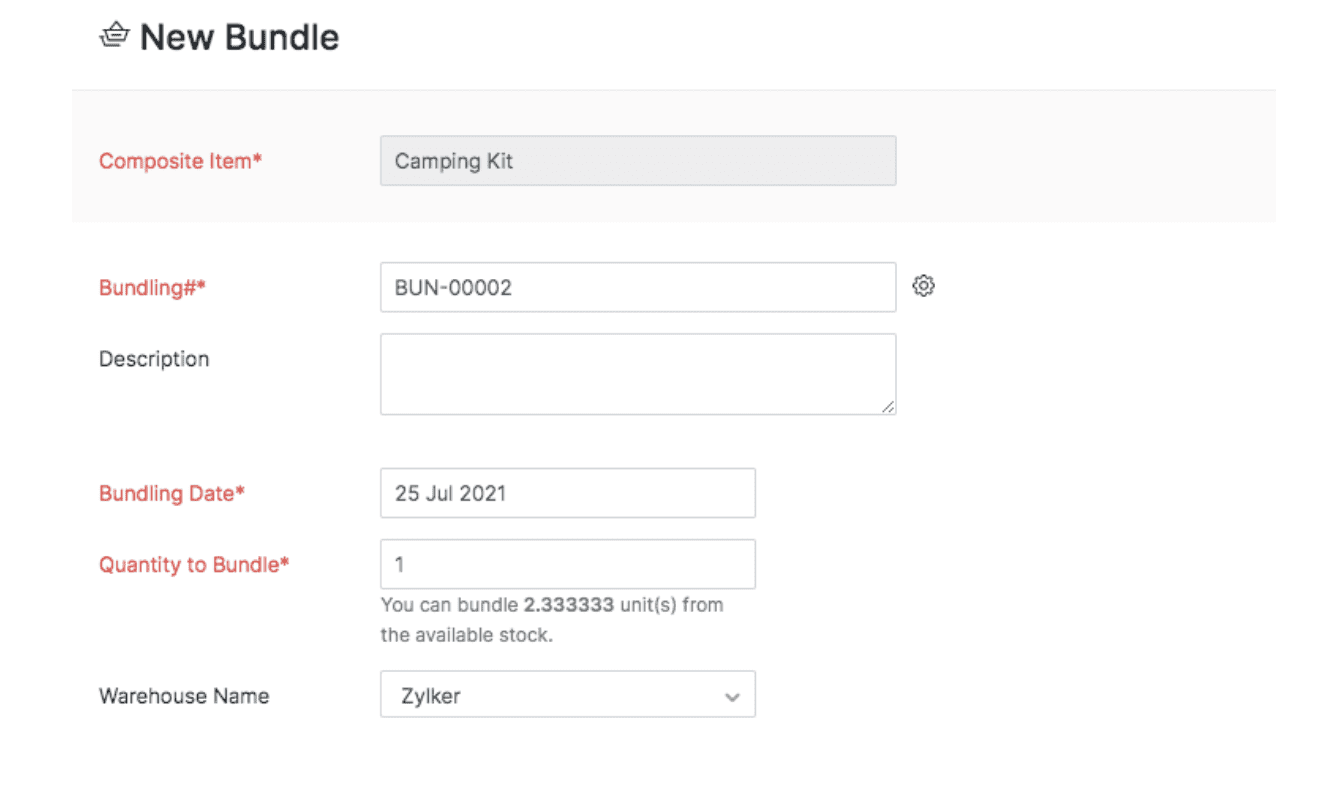
From here, you’ll need to specify the Bundling#, Bundling Date, Quantity to Bundle, and the warehouse within which you’d like to create the Bundle for this Composite Item.

ZBrains Zoho Inventory Bundles Screenshot 5

Finally, if you’ve enabled serial or batch number tracking for your Composite Item, you can use the screen pictured below to enter the serial or batch numbers for the bundle quantity.

ZBrains Zoho Inventory Bundles Screenshot 4

During this process, any items or services that are associated with the Composite Item will be auto-populated (you can also add, change, or remove items, as needed). Once your bundle is saved, the necessary adjustments will be made to your Zoho Inventory. 

If needed, you can also view past Bundle activity by visiting the Bundling History section and clicking the number associated with an individual Bundle.

ZBrains Zoho Inventory Bundles Screenshot 3

Creating Bundles from Sales Transactions

If you find yourself in a situation where the quantity in demand for one or more of your Composite Items is greater than the quantity you have available, you’ll want to use the Bundle option within sales orders or invoices to generate the quantity required.

Here’s how to do it:

  1. Go to the Sales Orders or Invoices module under Sales from the left sidebar of Zoho Inventory
  2. Create a new sales order or invoice and add a Composite Item
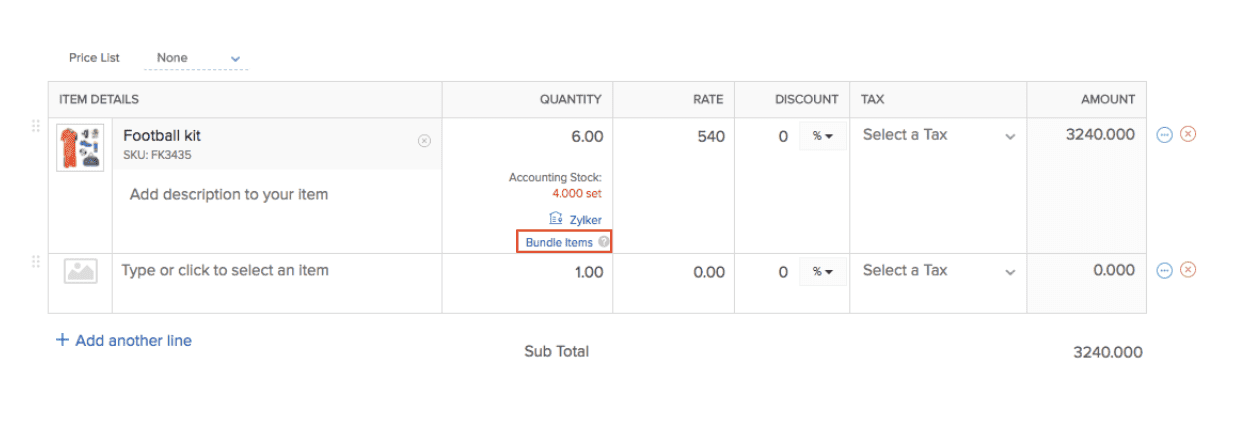
  3. Specify the number of Composite Items ordered by your customer (note that the quantity ordered will need to exceed the available quality shown to trigger the Bundle option to appear)

Zbrains Inventory Bundles Screenshot 2

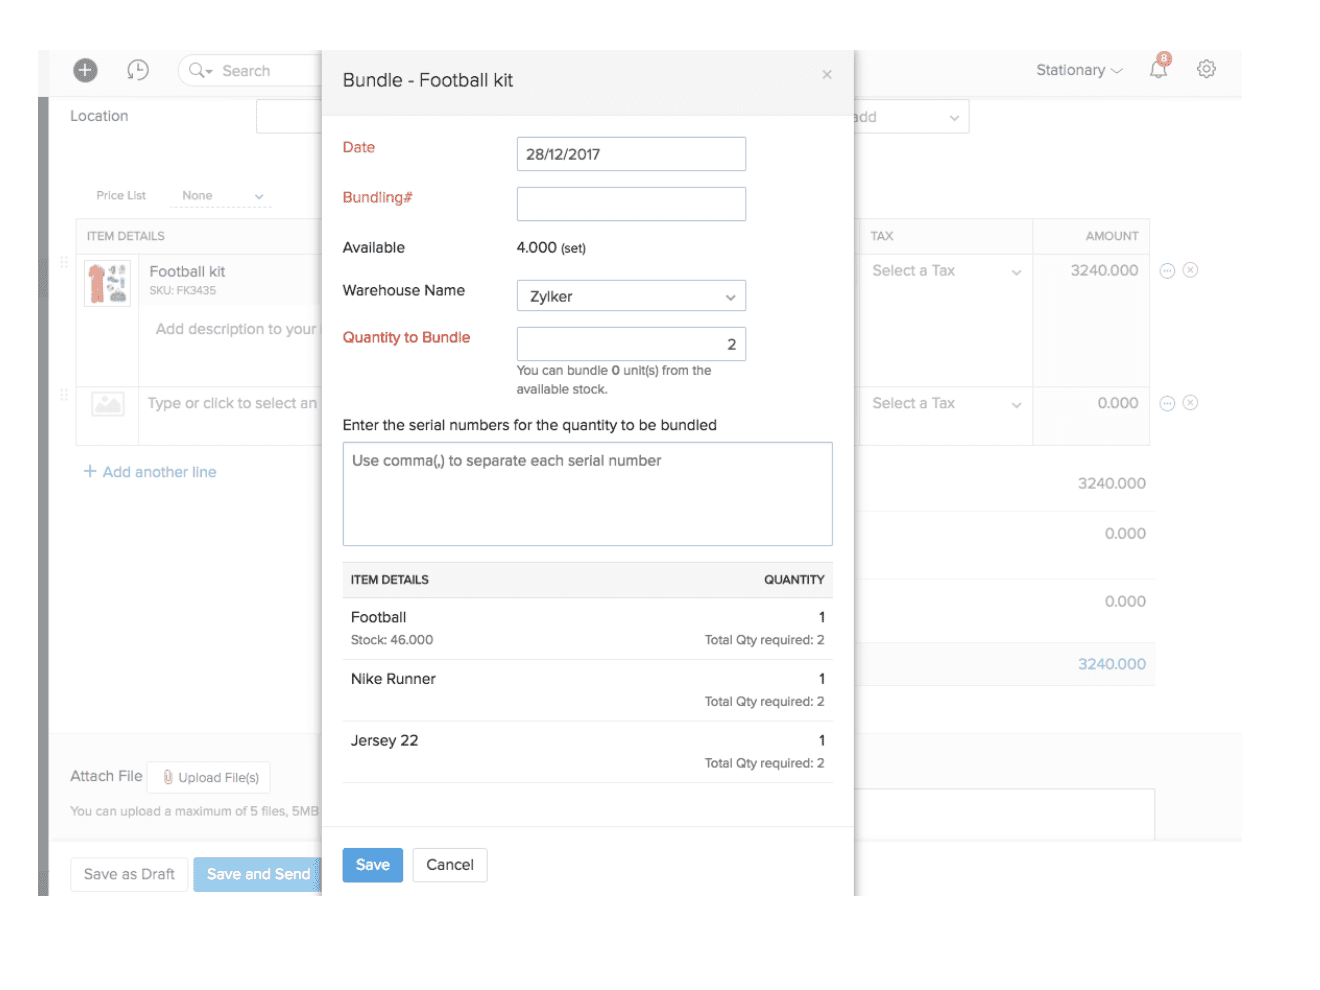
4. Click the Bundle option, and the required quantity of Composite Items that need to be bundled will be calculated automatically

ZBrains Zoho Inventory Bundles Screenshot 1

Creating Zoho Inventory Pricing Bundles in Zoho CRM gives you the flexibility needed to customize Composite Items for individual customers—for example, to add extra products or services to sweeten the deal for a single buyer.

However, we also recognize that managing Zoho Inventory Pricing can be tricky. If you have questions about working with Composite Items or Bundles in Zoho, get in touch with the expert team at ZBrains for assistance.

ZBrains Omnichannel Personalization

Zoho Analytics: Customize Marketing for Omnichannel Personalization

Zoho Analytics is a powerful tool for businesses looking to achieve omnichannel personalization in their marketing strategies. As a cloud-based business intelligence and analytics solution, companies can easily create insightful reports, dashboards, and visualizations. 

With features such as pre-built connectors, dynamic dashboards, and more, Zoho Analytics aids marketers in making better decisions on how to allocate resources for optimizing campaigns across multiple channels. Here, we’ll take a look at how to put it to good use by building an omnichannel marketing dashboard based on best practices we’ve observed working with ZBrains’ clients.

How does Zoho Analytics enable Omnichannel Personalization?

Zoho Analytics offers an easy-to-use, drag-and-drop builder that allows marketers to create custom dashboards with powerful visualizations, enabling omnichannel personalization. The platform includes several features that make it an ideal tool for creating an omnichannel marketing dashboard, including:

  • Pre-built connectors to quickly and easily connect data from multiple sources
  • Dynamic dashboards and drill-down reports, enabling marketers to slice and dice their data in real-time
  • Role-based access control, allowing organizations to manage who can access and edit dashboards
  • Automated data refresh, making it easy to maintain up-to-date reports
  • Advanced analytics with powerful AI capabilities for predicting future trends

However, Zoho can’t do it all on its own. For example, data from external sources must be connected to the platform before it can be used in dashboards. For this reason, it’s essential to understand the data sources available and how to connect them to Zoho.

Connecting Data Sources for Omnichannel Personalization with Zoho Analytics

Zoho Analytics provides a wide range of pre-built connectors that allow marketers to quickly and easily connect data from multiple sources.

To start, log in to your Zoho account and click the ‘Data Sources tab. Here, you’ll find a list of all the supported data sources and instructions on how to connect them.

Once the data sources are connected, you can begin creating your dashboard. Zoho Analytics provides several drag-and-drop options allowing marketers to create custom dashboards quickly. You can also use templates and widgets to customize the dashboard further.

Pulling Data From Multiple Sources With Zoho

Once your sources are connected, the next step is to combine data from multiple sources within your dashboard. 

To do this, select the data sources from which you want to pull data and then drag and drop them into the dashboard. You can customize the visuals using widgets, charts, and other elements.

Metrics to Track Using Omnichannel Personalization Reporting

Depending on your omnichannel strategy, there are several different metrics you may want to track in your dashboard.

SEO and Website Metrics

Key metrics to track:

  • Organic Traffic
  • Bounce Rate
  • Conversion Rate
  • Conversion Volume
  • Time on Site

You may also want to use Zoho Analytics to track the SEO performance of your content and campaigns (i.e., keywords, topic authority, backlinks, etc.), as this will help you understand how well your content is performing in terms of search engine rankings.

Social Media Metrics

Key metrics to track:

  • Total Dollars Spent (by campaign)
  • Number of Leads
  • Percent Junk (i.e., spam)
  • Cost per Click (CPC) (by campaign)
  • Cost per Lead (by campaign)
  • Revenue Generated (by campaign)
  • Return on ad spend (RoAS)

To get a complete picture of social media performance, you should monitor qualitative metrics like sentiment and user engagement. These metrics can be a little harder to measure but can provide valuable insights into the success of your campaigns.

SEM Metrics

Since many SEM activities are paid, they share some overlap with the metrics tracked for paid social media campaigns. The essential KPIs include:

  • Cost per Click (CPC)
  • Total Dollars Spent
  • Revenue Generated
  • Return on Ad Spend (RoAS)

Zoho Analytics can also help you monitor the cost and quality of the clicks you get for omnichannel personalization. This includes metrics like ad relevancy, click-through rate (CTR), impression rate, and keyword relevance. You can also compare your ad metrics against your SEO and web conversion metrics to determine whether or not your ads are worth the money.

Traditional Media

Finally, traditional media includes channels like television, radio, print, and out-of-home (OOH) advertising. Businesses can track metrics like budget spent, impressions, reach, and audience engagement in their dashboard.

Mostly traditional media outlets are mainly used for PR campaigns. These KPIs measure brand awareness and reach, ad recall, cost-effectiveness, and overall ROI.

Tips for a Successful Implementation and Choosing What to Track

Here are a few tips to ensure you get started on the right track with your new omnichannel dashboard:

  1. Start by mapping out your objectives. Could you identify the KPIs you want to track and ensure they align with your business and marketing goals?
  2. Choose data sources wisely. You can select only the seeds that will give you the most valuable insights into your marketing efforts.
  3. Use the proper connectors and integrations. Depending on the platform you are using for your dashboard, you may need to configure special connectors or integrations to pull data.
  4. Identify key performance indicators for each channel. Each channel should have its own set of KPIs, so could you make sure to track the right metrics?
  5. Create a dashboard that is user-friendly and informative. Could you ensure the dashboard is easy to navigate, understand, and use?
  6. Automate where possible. Automation can save you time and ensure the accuracy of your data.
  7. Avoid tracking too many KPIs. Too many metrics mean more work, so focus on the most critical KPIs for your business.

Some of the most commonly used Analytics connectors include Facebook Ads, Facebook Custom Audiences, Google Ads, Google Analytics, and LinkedIn Ads. Specific integrations you might want to consider having: 

  • VoIP: Integrating with VoIP services can help you track phone calls and conversations, mainly if your organization uses a service like RingCentral or Aircall.
  • Integrations with ESPs: Integrating with email marketing service providers (ESPs) like MailChimp, Constant Contact, and SendinBlue will allow you to track the performance of your email campaigns (if you aren’t managing your email marketing within Zoho).
  • Callrail: This call-tracking software helps you analyze the performance of your calls and conversations.
  • Clearbit: Integrating Zoho with Clearbit can help you get enriched data about your customers, such as job titles and social profiles.
  • ZoomInfo: This contact database aggregates publicly available data on businesses and people. Integrating with ZoomInfo can help you get insights into your target market.

Lastly, omnichannel personalization using Zoho Analytics is a way to boost customer satisfaction and drive sales.

We understand that setting up an omnichannel marketing dashboard in Zoho Analytics can be daunting. That’s why ZBrains is here to help. Our experienced professionals can guide you through the entire process, from data integration and customization to dashboard creation and optimization.

With ZBrains expertise, you can better understand your customer’s behavior and preferences and use that knowledge to deliver personalized experiences that drive engagement and loyalty. Please get in touch with us today to learn more about how we can help you achieve your marketing goals with Zoho Analytics.

A person using Zoho CRM by ZBrains Plus

Zoho CRM Plus: The Ultimate Unified Experience Solution

Zoho CRM Plus is a unified customer experience platform that helps you deliver an exceptional experience to every customer across all stages of their lifecycle and convert them into brand advocates.

The CRM Plus platform includes 9 powerful services in a single interface. Few other platforms, if any, provide such much high-value functionality across so many software apps at such a competitive price.

  • Zoho CRM: Sales automation and complete pipeline management
  • Zoho SalesIQ: Live chat and visitor tracking
  • Zoho Desk: Help desk
  • Zoho Projects: Project management
  • Zoho Campaigns: Email marketing
  • Zoho Analytics: Unified insights across teams
  • Zoho SalesInbox: Exclusive sales emails
  • Zoho Social: Social media marketing
  • Zoho Survey: Customer surveys

Empowering Business Growth: The Versatile Zoho Suite

Zoho CRM Plus is pre-integrated, providing access to shared customer data and a unified experience from a single console. Its simple onboarding mechanism has users up and running in the cloud from day one.

Zoho CRM

Highly rated on just about every customer review site, Zoho CRM offers powerful enterprise-level functionality that is highly configurable and easily customized to support faster onboarding, multiple pipelines, and reporting. As an added bonus, it is loaded with functionality that enables reps to prioritize tasks and stay organized, resulting in better throughput for businesses with larger pipelines.

Zoho SalesInBox

Zoho SalesInBox enables reps to prioritize communications by segmenting emails between active deals, regular contacts, and internal communications. It integrates with all leading email clients (Outlook, Gmail, Yahoo, and more) and synchronizes with email campaigns.

Zoho SalesIQ

Zoho SalesIQ is an all-in-one live chat and analytics platform. Its digital engagement tools let marketing, sales, and support teams communicate with site visitors at every stage of the customer lifecycle. Users can also easily build chatbots and personalized message routing. 

Zoho Desk

Zoho Desk is a full-featured help desk application that simplifies customer service operations, improves agent productivity, and delivers quality, lasting customer experiences.

Zoho Projects

Projects is Zoho’s cloud-based project management software, used for comprehensive project planning, efficient work tracking, and effective collaboration between teams. The functionality of Zoho Projects compares favorably with Asana, Trello, Smartsheet, Jira Cloud, Monday, and similar systems.

Zoho Campaigns

Zoho Campaigns provides the toolkit teams need to create email designs that elicit responses, customize messages, deliver emails to inboxes, connect with new customers, and trigger automated workflows.

Zoho Social

With Zoho Social, your teams can schedule unlimited posts, monitor what matters, and create custom analytical reports.

Zoho Survey

Zoho Survey turns survey creation into both a science and an art. With over 25 question types, features like skip logic and piping, customizable themes, and more, the perfect survey is just keystrokes away. The SSL-protected surveys can be shared instantly via email and social media.

Zoho Analytics

Zoho Analytics delivers powerful functionality paired with point-and-click simplicity. Users are able to generate insightful reports without needing to write SQL queries, although this capability remains available. It also features Zia, an AI-based voice assistant that provides sales teams with insights that make them more productive.


Customizing Zoho CRM Plus for Optimized Business Processes

  • Flexible Customization Options: Zoho CRM Plus provides businesses with extensive customization options to tailor the CRM software according to their specific requirements. Users may customize fields, layouts, modules, and workflows to their particular business processes. This flexibility allows businesses to create a CRM solution that reflects their workflows and captures the information they deem essential.
  • Customizable Sales Processes: Zoho CRM Plus enables businesses to define and customize their sales processes based on their unique sales methodologies. Sales stages, deal closure criteria, and sales forecasting can be customized to match the organization’s specific requirements. This customization ensures that the CRM system aligns with the company’s sales strategies and enhances sales team efficiency.
  • Personalized Dashboards and Reports: With Zoho CRM Plus, users can create personalized dashboards and reports to gain insights into their sales, marketing, and customer service activities. The CRM suite offers a drag-and-drop interface, allowing users to design customized visualizations that display key performance indicators and metrics relevant to their business. This customization empowers users to monitor and track the data that matters most to them, facilitating data-driven decision-making.
  • Workflow Automation: Zoho CRM Plus offers robust workflow automation capabilities that allow businesses to automate repetitive tasks and streamline their processes. Users can define custom workflows to automate lead assignment, task creation, email notifications, and more. By automating routine activities, businesses can save time, reduce manual errors, and ensure consistent and efficient operations.
  • Integration and Extensions: Zoho CRM Plus supports integration with various third-party applications and extensions, enabling businesses to further customize and extend the functionality of their CRM system. Through integrations, businesses can connect Zoho CRM Plus with other tools they use, such as marketing automation platforms, accounting software, or e-commerce platforms. This integration capability allows for a seamless flow of data and streamlines cross-platform operations.
  • API and Developer Tools: Zoho CRM Plus provides APIs (Application Programming Interfaces) and developer tools that allow businesses to develop custom integrations, extensions, or applications on top of the CRM suite. This customization capability enables businesses with specific requirements or unique workflows to extend the functionality of Zoho CRM Plus according to their needs.
  • Mobile Customization: Zoho CRM Plus offers mobile apps that can be customized to reflect the branding and specific requirements of a business. Users can tailor the mobile app’s interface, layout, and functionalities to match their business processes and ensure a consistent user experience across devices. This customization empowers mobile users to access and manage customer data while on the go.

By leveraging the customization capabilities of Zoho CRM Plus, businesses can create a CRM solution that aligns with their unique workflows, captures relevant data, and enhances overall productivity and efficiency. The flexibility to adapt and customize the CRM system allows organizations to optimize their sales, marketing, and customer service processes, leading to improved customer satisfaction and business growth.

What is the Difference Between Zoho ONE and Zoho CRM Plus?

The difference between Zoho CRM Plus and Zoho ONE is that CRM Plus unifies customer-facing teams to improve customer experience, while ONE enables businesses to operate lead to cash on one singular platform, consolidating vendors and software silos while streamlining your business operations.

  • Zoho CRM Plus includes the 9 essential enterprise-level applications to unify your sales, support, and marketing teams, providing a 360-degree view across all touchpoints for a consistent experience at every stage of the customer journey.
  • Zoho ONE, with more than 45 web applications, is an enterprise-level, all-in-one suite for running your entire organization. From sales, support, and marketing through finance, HR, recruitment, and more, Zoho ONE provides everything companies need to grow their business.

Should I Purchase Zoho CRM Plus or Zoho ONE?

The CRM Plus bundle is the obvious choice for companies that want to save money by only licensing customer-facing teams. Zoho CRM Plus is usually the best fit for companies that only want the functionality offered by its 9 applications. Although priced higher per user license, only customer-facing teams must be licensed. 

Zoho ONE, on the other hand, is priced lower per license than Zoho CRM Plus, but all employees must be licensed. 

Important note: While it is more expensive per user, Zoho does have a separate pricing model for those that want access to all the Zoho ONE apps but do not want to license every user in their organization

The Zoho ONE bundle is ideal for companies that need all employees to use the software. It’s also cost-effective for those who will ultimately pay less to license all employees (at the lower rate) than only those who are users (at the higher rate).

Regardless of the Zoho CRM chosen, either bundle provides substantial savings compared to licensing the included apps separately.

Conclusion

Still not sure what to purchase? Don’t worry. Talk to the experts at ZBrains who have worked with businesses similar to yours to help them migrate from their legacy systems. We can help you identify the apps that you should use to achieve your goals and prepare a cost-benefit analysis to gauge the best fit.

Reach out today for more information.

Manufacturing BOM using Zoho Inventory

How to Make a BOM with Zoho Inventory: A Comprehensive Guide

At a basic level, a bill of materials (BOM) is a list of the components, parts, materials, and assemblies needed to build an individual product. Sometimes referred to as a product structure, the BOM describes each item’s quantity and identity (name/number), as well as any relevant specifications such as size or weight.

Manufacturing companies use bills of materials (BOM) to track the components needed to create an end product, plan production schedules efficiently, maintain quality control, manage inventory, and track product and component stock for ordering purposes.

Enhancing Manufacturing Efficiency with Zoho’s Composite Items & BOMs

One of the reasons the Zoho platform is so popular among manufacturing businesses is its ability to easily generate and track these BOMs through the all-in-one Zoho Inventory suite.

That said, the language Zoho uses is a bit different than what you may be used to. Instead of a “bill of materials,” Zoho uses Composite Items, which are a combination of several items that work together to create a single product. For instance, an electronic device may contain batteries, wires, chipsets, and plastic components. To build the final device, all these individual parts need to be assembled.

In Zoho Inventory, you would define a Composite Item for the electronic device and then list all the components that make up the device—batteries, wires, chipsets, plastic components—as sub-items. This creates a “bill of materials” that shows what is needed to create one unit of the finished product.

The Benefits of Zoho Inventory Composite Items

Utilizing Composite Items in Zoho Inventory makes production more efficient, lessens the chances of missing items during packaging, and bolsters an organization’s understanding of its inventory. This is particularly advantageous for child items that are used in multiple parent items.

Bundling each piece in Zoho Inventory can also make it easier for you to keep track of and comprehend your stock. For example, Composite Items can be used by producers and distributors for easy assembly—just like a Bill of Materials. If you were building a printer, Zoho’s Composite Items could be used to define all the required elements, including not just the electronics, cables, and ink, but the printer itself as well.  

Unsure if Zoho Inventory is right for your business? Contact ZBrains to get a personalized evaluation of your needs.

How to Enable Composite Items in Zoho Inventory

Enabling Composite Items in Zoho Inventory is simple. All you need to do is:

  1. Navigate to Settings, then Preferences
  2. Click the Items tab, and a menu will appear
  3. Check the Enable Composite Items box
  4. Hit Save to apply the changes, then exit

How to Create Inventory Bundles for Composite Items

In Zoho Inventory, bundling items into Composite Items takes just a few steps:

Creating Inventory Bundles for Composite Items Screenshot 8

To create a bundle of a Composite Item, go to the Inventory module and open the appropriate Composite Item.

ZBrains Inventory Bundles for Composite Items Screenshot 7

From there, click the “Create Bundle” button and enter the Bundling #, Date, and Quantity you would like to Bundle, as well as any Serial or Batch Numbers for tracked items.

how to make a bom

Once you’ve added all your details, click “Save.” The items and services associated with the Composite Item will automatically appear (you can modify these, if needed).
ZBrains Inventory Bundles for Composite Items Screenshot 5

Click on the bundle number in the Bundling History section to view all bundling details.

Advanced Inventory Tracking With Zoho Inventory

Managing so many parts creates a higher risk of mismanagement, but Zoho Inventory’s advanced tracking features keep your Composite Items organized and on track.

Batch Tracking

Batch tracking is a highly-efficient way to monitor and group stock items that have common characteristics (e.g., serial number, expiry date, color, and product association).

Manufacturers can use batch tracking to track production batches across different locations, warehouses, and stores (or keep it all under one roof), saving time by managing all of their items from a single interface.

Moreover, this system provides thorough data analysis, allowing for accurate predictions and estimations related to your inventory levels. With Zoho Inventory, you can easily track items that come in batches with the corresponding manufactured and expiry dates, if relevant. When it’s time for a sale, you can safely select products within their usable period from those same batches.

ZBrains Inventory Bundles for Composite Items Screenshot 4

To generate a new item with batch tracking activated, navigate to the item creation page. Fill out all applicable details and then check the box next to “Track Batches” under Advanced Inventory Tracking.

If you have an established opening stock, include any essential batch details in the fields below. If your business takes advantage of multi-warehouse inventory tracking, use the ellipsis icon at the end of each row to add batches for that warehouse, where appropriate.

ZBrains Inventory Bundles for Composite Items Screenshot 3

From there, all you have to do is enter the batch details—including its serial number, manufacture date, expiry date, and any other relevant information. Once you’ve entered all the details, click “Save” to add your item with batch tracking enabled.

Serial Number Tracking

Track items with serial number tracking in Zoho Inventory for precise monitoring from factory to consumer.

Serial number tracking is especially useful for service-based businesses that need to keep track of replacement parts and components used to perform repairs or maintenance tasks. To enable serial number tracking in Zoho Inventory, go to the new item page and select “Track Serial Numbers” under Advanced Inventory Tracking.

ZBrains Inventory Bundles for Composite Items Screenshot 2

Then, enter the necessary details. Again, if you have opening stock, you can enter the serial numbers in the specified field below. If multi-warehouse enabled, click ellipsis icon beside warehouse row, then ‘Add Serial Numbers’.

ZBrains Inventory Bundles for Composite Items Screenshot 1

Enter the serial numbers and any other relevant information that you need to track from there. Once you’ve added all the details, click “Save” to finish creating your item with serial number tracking enabled.

Final Thoughts: Zoho Composite Items and BOM (Bill of Materials)

Zoho Inventory streamlines production across multiple locations with Composite Items, Batch Tracking, and Serial Number Tracking.

Zoho Inventory simplifies BOM creation and empowers inventory management and forecasting with powerful features.

Every organization has its own unique tracking needs, creating and tracking Composite Items is just the tip of the iceberg. For more information on generating BOM reports, tracking item components, and managing inventory on a deeper level with Zoho Inventory, reach out to our expert team today.

ZBrains Zoho Dashboards for Sales

Building Zoho Dashboards for Sales: Your Ultimate Guide by ZBrains

Zoho CRM is a user-friendly and robust customer relationship management software suitable for businesses of any scale. It helps companies effectively manage customer interactions, automate sales processes, and monitor performance. With the help of Zoho dashboards, businesses can quickly get insights into their sales pipeline, identify bottlenecks, and make data-driven decisions to improve their sales performance. 

But one of the best features of Zoho CRM is its ability to create powerful, visually appealing sales dashboards. A well-designed dashboard can help you get an accurate picture of your business’s performance at a glance. With the right data, your dashboards can identify key trends, highlight opportunities, and help you make informed decisions.

Optimizing Sales Performance with Zoho CRM and Analytics

Zoho CRM simplifies sales, marketing, and customer service by utilizing a unified data source for all activities. This approach enables businesses to easily track essential metrics such as sales volume, order fulfillment rate, and revenue per customer. With the help of Zoho dashboards, businesses can efficiently monitor the performance of individual employees or teams by comparing their metrics against those of others within the organization. This valuable information empowers businesses to make data-driven decisions and optimize their sales process for better results.

Zoho Analytics, on the other hand, can use multiple data sources from across the organization to provide an even more comprehensive view of your sales performance. For example, you can track customer lifetime value (CLV) and customer acquisition cost (CAC), as well as average order size, frequency of purchase, and other metrics. Users can also embed these into the Zoho CRM homepage to quickly overview their business performance in real-time.

Zoho CRM provides a variety of views tailored to meet the needs of individual sales reps, managers, and executives. These views offer insights into essential key performance indicators (KPIs) that businesses should monitor. With the help of Zoho dashboards, businesses can effortlessly keep track of these KPIs, optimize their sales process, and maximize their revenue. Let’s explore the specific KPIs you should monitor for each role within your organization.

Individual Sales Reps

To effectively monitor individual sales reps responsible for identifying prospects, closing deals, and driving growth, track their performance on specific metrics such as:

  • Number of Leads: The number of leads created or assigned in a given time frame.
  • Number of Meetings: The total number of meetings booked with new prospects.
  • Number of Meetings Completed: The number of scheduled meetings that successfully occurred.
  • Show Rate: The number of meetings that were attended vs. the number of meetings that were scheduled.
  • Opportunities Created: The number of opportunities created in a given time frame.
  • Lead Conversion Rate: The percentage of total leads that have been converted into customers.
  • Total Pipeline Value: The total dollar value of all opportunities in the sales pipeline.
  • Total Pipeline Growth: The change in the pipeline value over time.
  • Total Deals Closed: The number of deals closed in a given time frame.
  • Dollar Amount Closed: The total dollar amount of all deals closed in a given time frame.
  • Win Rate: The percentage of total deals that are closed successfully.
  • Lead-to-Win Rate: The number of leads it takes to close a deal.
  • Leads/Opportunities/Accounts With Activity: The number of leads that have had activity (calls, emails, meetings) in a given time frame.
  • Activity Levels: The average number of activities performed by each sales rep (on an individual activity basis) in a given time frame.

Sales Managers

Sales managers should be responsible for the sales metrics of the team, as they oversee the sales team and ensure each rep achieves their goals.

  • Rep Metrics: Sales rep performance data such as lead conversion rate, win rate, and dollar amount closed.
  • Team Metrics: Team-level performance data such as total pipeline value, average deal size, and overall close rate.
  • Cohort Analysis: The ability to compare sales performance among different groups of reps (e.g., by location or product
  • Metrics by Geography/Territory: The total number of deals, pipeline value, and revenue based on geographic region.
  • Metrics by Product: The total number of deals, pipeline value, and revenue based on the product or service being sold.
  • Metrics by Lead Source: The total number of deals, pipeline value, and revenue based on the lead source.
  • Revenue by Person: The total dollar amount closed by each sales rep in a given time frame.
  • Forecasted Revenue: The estimated revenue to be earned in the next quarter or year, based on pipeline value and rep metrics.

Executive Leadership

Executives can use Zoho dashboards to ensure the company is on track to reach its goals, and that all departments are working together efficiently.

  • Lead-to-Win Rate: The rate at which leads are converted into customers shows executives how efficient the sales process is.
  • Pipeline Value: The total dollar value of all opportunities in the sales pipeline helps executives track progress toward their goals.
  • Net New Customers: The number of new customers acquired in a given time frame.
  • Revenue Trends: Year-over-year revenue trends show executives if the company is on track to meet its goals.
  • Customer Lifetime Value (CLV): The total value of all transactions with existing customers helps executives understand customer loyalty and profitability.
  • Customer Acquisition Cost (CAC): The cost of acquiring each new customer is a critical metric that shows executives how efficient their sales process is.
  • Churn Rate: The rate at which customers are lost can indicate customer satisfaction and potential areas of improvement.
  • Sales Efficiency: The overall efficiency of the sales team demonstrates how much time and effort is being spent on each sale.

How to Build an Effective Sales Dashboard in Zoho CRM

Whatever metrics you intend to track, here are a few of our top suggestions for monitoring them within your Zoho CRM sales dashboard.

  1. Choose two critical metrics for each role in your organization. Assign each person a leading KPI and a trailing KPI based on importance
  2. Make sure your system can easily gather the necessary data for the KPIs by setting up automation, automating your reporting, or defining custom fields. You can accomplish this by establishing automation, automating your reporting, or defining custom fields.
  3. Create a weekly version of each KPI, grouped by person, and also for the entire company/department. This will help you get a better understanding of each person’s performance and let you easily compare it with the team as a whole.
  4. Make sure to verify the data and the report’s accuracy, especially if you plan to tie them to performance reports or incentives. 
  5. Add a trend (and perhaps a forecast), if you have enough data to do so.
  6. Hold a weekly-to-daily meeting to review the KPIs. Hold people responsible for their performance by having a discussion and tracking progress over time.
  7. Set quotas and targets for each KPI. Target is generally 20% above quota, and quota is the desired outcome for each metric.
  8. Create a contest or incentives around your target(s) to motivate your team.

Finally, try not to change the KPIs too much, or too quickly, unless everyone agrees that doing so is appropriate. Determining the “right” KPIs and optimal quota for your organization might take some time, but it’s still best to be as consistent as possible.

Need help creating your ideal Zoho sales dashboard? ZBrains’ expert team is standing by for any sales tracking or measurement questions you may have. Reach out today for more information.

ZBrains Zoho Desk Help

Zoho Desk Help: How to Automate and Customize Support Tickets for Best Customer Satisfaction

Zoho Desk helps you streamline customer service operations, increasing productivity and providing exceptional customer service.

What is Zoho Desk?

Zoho Desk is a cloud-based customer service and help desk automation solution designed to streamline the way businesses handle their customer support operations and provide a top-notch customer experience.

By integrating your help desk into your Zoho CRM using Zoho Desk, you’ll enjoy:

  • An abundant feature set
  • A strong out-of-the-box integration with Zoho CRM
  • The ability to create and view tickets within Zoho CRM (without needing to leave it)
  • Cost savings over purchasing a standalone help desk software

However, you’ll want to explore Zoho’s customization and automation features to get the most out of your Zoho Desk integration. Here, we’ll look at some of the best practices and features ZBrains has identified to help you set up your support ticket system within Zoho Desk. By leveraging these helpful tips and features, businesses can optimize their customer support operations and enhance the customer experience.

Customizing Tickets in Zoho Desk

Zoho Desk makes it easy for users to create and manage their tickets, customize them with custom fields to capture the right data needed for each situation, and initiate automation workflows that allow end users to track ticket progress better.

Using the custom fields, users can also track and report on the tickets handled within Zoho Desk, enabling them to generate insights into customer service trends and make data-driven decisions on improving the overall customer support experience. 

Zoho Desk comes with plenty of user-friendly features, such as Blueprints, though most users will want to customize their help desks according to their own unique systems and processes. 

What are Blueprints in Zoho?

Blueprints in Zoho are pre-built applications that enable users to easily take advantage of a wide variety of preconfigured business processes. With drag-and-drop design patterns, users don’t need technical or coding knowledge to create efficient, customized workflows that suit their needs.

Configuring Blueprints is a powerful way to automate ticketing operations, as they allow users to assign priority levels and approval mechanisms based on the type of issue being handled. But in terms of customizability and scope, Blueprints have their limitations.

Due to the pre-built nature of Blueprints, many of the underlying components that make up each application are hard-coded and can’t be changed without replacing them entirely. This means that while you can customize many elements, reaching a level suitable for maximum efficiency might not always be possible with a blueprint-based solution.

For the same reason, some of the features that Zoho’s standard applications offer might not be available on a Blueprint. For maximum impact, custom-built operations are best—and the good news is that they’re easy to set up.

Implementing and Automating Ticket Statuses

Ticket statuses are paramount to the operations of a help desk, but we’ve found that the stock statuses in Zoho aren’t sufficient for most users’ needs. Instead, we prefer using the following statuses:

  1. New (default status): This is the starting point of an open ticket. Any time a new ticket comes in, it defaults to this.
  2. In Progress: This is probably the most important status, as it indicates that a ticket has been assigned to an agent and is currently being worked on.
  3. Scheduled: If you need to schedule a ticket for a later date, this is the status that should be used to indicate that the ticket has been scheduled and will be worked on at a specific time.
  4. Awaiting Approval: This is a great way to keep track of tickets that need approval from team members or supervisors before they can be closed.
  5. Awaiting Client: This is used when a ticket requires further input from the client before it can be closed. After a week without a client response, automatic approval will occur.
  6. Awaiting Employee: This status is similar to the “Awaiting Client” status but is used when a ticket requires further input from an employee. Clients don’t see employee communications, so employees can use this status to comment internally and reply externally.
  7. Awaiting Vendor: This is used when a ticket requires input from Zoho, and it can be set to send automated reminders every couple of days.
  8. Completed: This closed status allows the customer to reopen a ticket if they are not satisfied with the outcome.
  9. Closed: This is the final status; unlike “Completed,” this one can’t be reopened.
  10. Closed/Deal Created: This status is used when a ticket results in an upsell, cross-sell, or other deal.
  11. No Support Plan/Out of Scope: This status can be used for tickets that don’t fit into any other statuses, such as classifying tickets as needing no support, being out-of-scope, or requiring no further action.
  12. Approved: Zoho has its own approval system, so this status is not used much.
  13. Rejected: Again, Zoho has its own rejection system, so this status is also not used much.

Comparing Service Performance to SLAs

Service level agreements (SLAs) in Zoho are extremely important for setting and monitoring customer service expectations. They assure customers that certain services or tasks will be completed within a predetermined time frame, and they provide a basis for tracking and measuring customer service performance.

Since they commonly include requirements for resolution, response, and resolution times, they also serve as a way to compare actual customer service performance to the desired level of customer service.

The best way to compare service performance against SLAs is to use reports based on your ticketing system. Reports can give you an overview of how well your team is meeting customer expectations in terms of response time, resolution time, and first-contact resolution. You can also use reports to analyze customer satisfaction scores, agent performance levels, and resource utilization statistics.

Technically, a 100% rate is ideal for SLAs as this would indicate that the team is meeting all of the customer service criteria within its SLA. However, depending on the size and complexity of your operations, it may not be feasible to reach a 100% rate, as certain tasks or services are more difficult to complete than others.

Particularly during the holiday season or times of high traffic, it can be difficult for agents to keep up with the influx of tickets. As such, 90% is generally a good target for SLAs. Pay attention to your reports if you aren’t meeting this expectation—reviewing progress through different ticket stages can help you identify where delays are occurring. 

Customizing Supervisor Rules

Supervisor rules are time-based actions (i.e., automatically executing on or after a certain time) that enable supervisors to take control of tickets quickly and effectively. These rules are customizable, so you can set conditions that best suit your organization’s needs.

For example, a supervisor may decide to set a rule that automatically assigns a Zoho Desk ticket to the team leader if it has been open for more than two hours without any action. Alternatively, they may want to set a rule that sends a reminder to team members if they haven’t updated a ticket in a certain period of time.

When it comes to supervisor rules, keep the following best practices in mind:

  • Always keep these support tickets moving. The longer a ticket stays in one state, the less likely it is to be resolved.
  • Prioritize tickets based on customer need and urgency. This will help prioritize support efforts and reduce resolution time.
  • Make sure rules are well-defined so that your team members understand when they should take action.
  • Use custom supervisor rules to ensure that tickets are managed AND resolved promptly.

With the right supervisor rules in place, users can perform better against their SLAs. They can also ensure that customer service best practices are adhered to, resulting in a higher level of customer satisfaction.

If you need further help—or if you’d like an expert perspective on support ticket system best practices—reach out to ZBrains’ team of Zoho specialists